Introduction to Allamanda
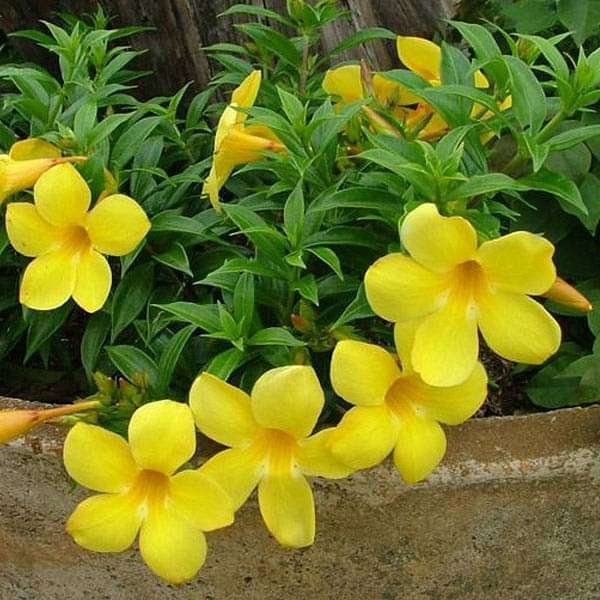
The Allamanda plant, native to tropical regions of the Americas, is a captivating addition to any garden due to its striking visual appeal. With its glossy, dark green foliage and vibrant, yellow trumpet-shaped flowers, Allamanda stands out as a popular choice among gardening enthusiasts. The plant is a member of the Apocynaceae family and consists of several species, with Allamanda cathartica being the most commonly cultivated. The variety in colors, including shades of yellow and peach, further enhances its attractiveness, making it suitable for ornamental landscaping.
In terms of growth habits, Allamanda plants can be found in both creeping and climbing forms, and they can reach heights of 10 to 12 feet when left unchecked. This versatility allows them to be used in various settings, from container gardens to trellises and even as ground cover. Their rapid growth makes them particularly appealing for gardeners seeking quick results, even though they may typically thrive in warm climates. These plants flourish in sunny environments and are often planted in USDA hardiness zones 9 through 11, where they can enjoy ample sunlight and warmth.
Another reason for the Allamanda’s popularity is its relatively low maintenance requirements. Once established, they are resilient to drought but benefit from regular watering and fertilization to produce the best blooms. Additionally, Allamanda plants are known for attracting butterflies and hummingbirds, further enriching the garden ecosystem. Their ability to adapt well to various soil types, provided they offer good drainage, makes them a favorable choice for gardeners looking to introduce a splash of color and attract wildlife to their outdoor spaces.
Understanding Cuttings as a Propagation Method
Propagation through cuttings is a widely practiced technique in horticulture, particularly effective for cultivating various plant species, including the Allamanda. This method involves taking a portion of a plant, typically a stem or leaf, and encouraging it to develop roots, thus creating a new plant. The advantages of using cuttings to propagate Allamanda plants are numerous. Firstly, this technique allows gardeners to produce new plants that are genetically identical to the parent, ensuring that the desirable traits of Allamanda are preserved in the new specimens. Moreover, using cuttings can be significantly more economical compared to purchasing mature plants from nurseries.
When it comes to types of cuttings, they can generally be categorized into softwood, semi-hardwood, and hardwood cuttings. Softwood cuttings are taken from new growth, typically during the spring and early summer when the plant is actively growing. These cuttings are usually tender and root relatively easily. Semi-hardwood cuttings, influenced by established growth, are taken during mid-summer to fall when the stems begin to mature but are still supple. Hardwood cuttings, on the other hand, are obtained from fully matured growth and are best taken during late fall or winter when the plant is dormant. Each type of cutting has its specific advantages and challenges, making it essential for gardeners to choose the appropriate method based on the growth stage of their Allamanda plants.
Timing is equally important when taking cuttings. Ideally, cuttings should be taken during periods when the parent plant is healthy and thriving. For Allamanda, the best times are likely in the spring or early summer for softwood and semi-hardwood cuttings. This increased vigor during these seasons leads to better rooting success. Understanding the nuances of the cutting method will lay a strong foundation for successful propagation of Allamanda plants, leading to a thriving garden.
Preparing for Propagation: Tools and Materials
Starting the process of propagating Allamanda plants from cuttings requires several essential tools and materials to ensure a successful outcome. The first item on the list is a pair of quality pruning shears. Investing in sharp, clean shears is crucial, as they provide a clean cut that reduces damage to the plant and minimizes the risk of disease. The cuttings should ideally be taken from healthy, vigorous Allamanda plants, and using appropriate shears permits a precise cut just below a node.
Next, selecting the right pots is vital for the growth of your cuttings. Small containers with drainage holes are ideal for propagating Allamanda, as they allow excess moisture to escape and prevent root rot. Ensure that the pots are sterile to further reduce the chance of infection during the propagation period.
Potting soil formulated for seed starting or a well-draining mix is another key element. Allamanda cuttings require a moist environment, but the soil must also be aerated to support root growth. A mix that includes perlite, vermiculite, or sand can facilitate drainage while retaining moisture, which is essential for the propagation process.
Another important material to consider is rooting hormone. This powder or gel helps stimulate root growth in cuttings and increases the likelihood of successful propagation. Applying rooting hormone to the cut ends of the Allamanda cuttings can significantly improve rooting success.
Lastly, using plastic covers—a clear plastic bag or a plastic dome—creates a humid environment that is vital for the cuttings. Insulating the cuttings helps retain moisture and warmth, aiding in the development of roots. These indispensable tools and materials collectively lay the foundation for successfully propagating Allamanda, leading to flourishing new plants.
Taking Cuttings: Step-by-Step Instructions
Taking cuttings from an Allamanda plant can be an effective method for propagation, ensuring a robust and flourishing plant for your garden. To start, it is crucial to select healthy stems, as this significantly impacts the success of the rooting process. Look for stems that are vibrant and free of any disease or damage. These healthy stems should ideally be semi-hardwood; they are usually not too young or too old, which enhances the chances of rooting.
Once you have identified suitable stems, use sharp, clean pruning shears or scissors to make the cut. It is advisable to make the cut just below a node, which is where a leaf or branch meets the stem. This technique encourages new growth and enhances rooting potential. Aim for cuttings that are approximately four to six inches in length. This length provides enough stem to anchor into the soil while containing sufficient nodes for growth.
After cutting, it is beneficial to remove any leaves from the lower half of the cutting. Remaining leaves can impede rooting by drawing moisture away from the stem. Some gardeners also opt to dip the cut end in rooting hormone, which can facilitate faster root development. Once prepared, place the cuttings in a well-draining potting mix, ensuring they are planted at least one to two inches deep. Water the cuttings gently and provide them with high humidity by covering them with a plastic bag or using a propagation dome, but ensure that there is some airflow to prevent mold.
In conclusion, following these step-by-step instructions to take cuttings from your Allamanda plant will contribute significantly to their successful propagation. Proper technique can lead to thriving new plants that will beautify your garden or landscape.

yellow allamanda flower plant live (pack of 1)
COD |
COD are available |
|---|---|
Replacement |
Replacement are available |
Return |
Return are available |
Delivered |
Free Delivered FREE Within 5-7 business days |
Rooting the Cuttings: Techniques and Conditions
Rooting Allamanda cuttings successfully requires attention to various environmental factors and techniques. One of the most effective methods is to utilize rooting hormone. This product contains auxins, which aid in stimulating root production. When preparing your Allamanda cuttings, it is beneficial to dip the cut end into the rooting hormone powder, ensuring that the hormone covers the cut surface adequately. This practice can significantly increase the chances of successful rooting.
Moisture levels play a critical role in the health of the cuttings. Allamanda cuttings thrive in a humid environment, which is essential for root initiation. To maintain the necessary moisture, consider covering the cuttings with a plastic bag or a mini greenhouse. It is crucial to ensure that the covering does not touch the leaves, as this can promote mold growth, which may threaten the cuttings’ health. Regularly check the humidity levels and mist the cuttings as necessary to avoid drying out, while still preventing over-saturation, which can lead to rot.
Light conditions also significantly impact the rooting process of Allamanda cuttings. Ideally, they should be placed in a location with bright, indirect sunlight. Direct sunlight can be too harsh and may stress the cuttings, impeding their growth. A temperature range of 70°F to 85°F is optimal. Keeping the cuttings in a warm environment will accelerate root development. Container choice is also important; using a sterile, well-draining medium such as a mixture of perlite and peat moss allows for excellent drainage, reducing the risk of root rot. Utilizing small pots or propagation trays provides ample space for the cuttings and makes management easier. By following these techniques and conditions, you enhance the likelihood of successful rooting for your Allamanda cuttings.
Caring for Newly Rooted Cuttings
Once Allamanda cuttings have successfully rooted, providing appropriate care is crucial for their continued growth and development. Initially, it is essential to ensure that the young plants remain adequately hydrated. Newly rooted cuttings require consistent moisture without becoming waterlogged. Watering should be done when the top inch of the soil feels dry to the touch. Using a well-draining potting mix helps maintain optimal moisture levels while ensuring adequate oxygen supply to the roots.
Light exposure is another vital aspect in the care of newly rooted Allamanda cuttings. These plants thrive in bright, indirect sunlight. Placing the cuttings in a location where they can receive filtered light will promote healthy growth while preventing leaf scorch. As the plants establish themselves, gradually introducing them to more direct sunlight will help strengthen their structure and foliage. However, care should be taken not to expose them to harsh midday sun, as this can hinder their development.
Fertilization should begin once the cuttings establish a good root system, typically after a few weeks. A balanced, water-soluble fertilizer can be applied bi-weekly to encourage robust growth. It is essential to follow the manufacturer’s recommendations for dilution to avoid any potential nutrient burn. Additionally, responsive care should be taken to observe the plants for signs of nutrient deficiencies, such as yellowing leaves, which may indicate a need for adjusted feeding.
Finally, acclimatization is crucial for helping young Allamanda plants transition from the controlled environment of rooting to their eventual outdoor setting. Gradually exposing them to wind and outdoor temperatures over a period of 7 to 10 days will help them adapt and thrive in their future location. Following these care requirements will ensure that newly rooted Allamanda cuttings can flourish and develop into healthy, vibrant plants.
Transplanting Allamanda Cuttings into the Garden
Once your Allamanda cuttings have established roots, the next step is to transplant them into their permanent location, whether in larger pots or directly into the garden. Timing is crucial; the best period for transplanting is in the spring or early summer when weather conditions are favorable for growth. This allows the Allamanda plants to acclimate to their new environment with minimal stress.
Before transplanting, it is vital to prepare the soil. Allamanda requires well-draining soil that remains consistently moist but not soggy. A mix of potting soil enriched with organic matter, such as compost or aged manure, can provide the necessary nutrients while ensuring adequate drainage. Ideally, the soil pH should be slightly acidic to neutral, ranging between 6.0 to 7.0, which promotes optimal growth conditions.
When transplanting, select a location that provides full sun exposure for at least six hours a day, as Allamanda plants thrive in bright light. If planting in the garden, ensure adequate spacing between each cutting to allow for air circulation and growth. A distance of 2 to 3 feet apart is recommended, as mature Allamanda can grow quite large and bushy. This spacing helps prevent overcrowding and reduces the risk of disease.
When moving your rooted cuttings, handle them gently to avoid damaging the roots. If they are in a pot, ease them out carefully and avoid disturbing the root ball. For garden planting, dig a hole that accommodates the root system, place the cutting in the hole, and backfill with soil, pressing it down lightly to eliminate air pockets. Finally, water thoroughly to help settle the soil around the roots.
Ensuring the right soil conditions and spacing is critical for the successful transplantation of Allamanda cuttings. Correctly executed, this process will lead to vigorous growth and a flourishing plant in your garden.
Common Problems and Troubleshooting
Propagating Allamanda plants from cuttings can be a rewarding experience, but like all gardening endeavors, it comes with its set of challenges. Understanding potential issues is crucial for ensuring successful growth and development of your Allamanda cuttings. One common problem gardeners face is the risk of fungal infections. This can occur due to high humidity levels or overcrowding of cuttings. To prevent fungal growth, it is essential to provide adequate air circulation and avoid excessive misting. If you notice any signs of mold or rot, it is advisable to remove the affected cuttings immediately and ensure that the remaining ones are placed in a well-ventilated area.
Overwatering is another significant issue that can compromise the health of Allamanda cuttings. While maintaining moisture is vital for rooting, too much water can lead to root decay. To avoid this, ensure that the potting medium is well-draining. A mixture of potting soil combined with sand or perlite can facilitate better drainage and prevent water accumulation. Check the moisture levels regularly, allowing the soil to dry slightly between watering sessions.
Insufficient light can also hinder the growth of Allamanda cuttings. These plants thrive in bright, indirect sunlight, so placing them in a location with inadequate light can cause them to become leggy and weak. If you notice your cuttings stretching towards the light, consider relocating them to a sunnier spot or supplementing with grow lights, ensuring they receive at least six hours of filtered light each day.
By being aware of these common problems and implementing preventative measures, you can enhance the success rate of your Allamanda propagation efforts. With a proactive approach to troubleshooting, you can enjoy healthy and vigorous plants that flourish in your garden.
Conclusion and Final Tips
Growing Allamanda plants from cuttings is a rewarding and fulfilling process that allows gardeners to cultivate beautiful blooms in their own yards. Throughout this guide, we have discussed the key techniques involved in selecting, preparing, and planting cuttings as well as the essential care needed to ensure successful growth. By following these steps, you can increase the likelihood of establishing healthy Allamanda plants that will thrive in your garden.
To summarize, starting with healthy cuttings is crucial. Ensure that you select stems that are sturdy, preferably semi-hardwood, and free from disease. The rooting hormone application can significantly enhance root development, leading to a more robust plant. After planting, maintaining consistent moisture without overwatering will help prevent issues related to root rot, a common problem in young cuttings. Moreover, placing your cuttings in a location with adequate light will promote optimal growth, but be cautious about exposing them to harsh afternoon sunlight as this can hinder their development.
As you embark on this gardening journey, consider experimenting with different soil types and potting techniques to discover what works best for your specific environment. Observing your Allamanda closely will provide valuable insights into its growth patterns and needs, allowing you to make necessary adjustments. Additionally, don’t hesitate to seek advice from local gardening communities or online forums for more tips and tricks tailored to your region’s conditions.
In conclusion, growing Allamanda plants from cuttings offers a fantastic opportunity to engage with nature and expand your horticultural skills. Enjoy the process and take the time to watch your plants flourish, for each phase of growth unveils the beauty and elegance of these stunning flowering vines.